📋 Table of Contents
- ⚡️ Quick Guide: Habitat Essentials
- 🧠 Step 1: Research Your Species
- 🏠 Step 2: Choosing the Right Enclosure
- 🌿 Step 3: Interior Design & Ventilation
- 🌡️ Step 4: Mastering Parameters
- 💧 Step 5: Maintenance & Care
- ❓ FAQ: Common Questions
⚡️ Quick Guide: Habitat Essentials
To successfully set up a jumping spider habitat, you need an arboreal (tall) enclosure with front-opening doors and cross-ventilation. The ideal environment mimics a tree canopy with:
- Temperature: 69°F – 83°F (20°C – 28°C)
- Humidity: 50% – 60% (Mist daily)
- Enclosure Size: 6x6x9 inches (Minimum for adults)
- Lighting: Bright LED (6000K) on a 12-hour cycle
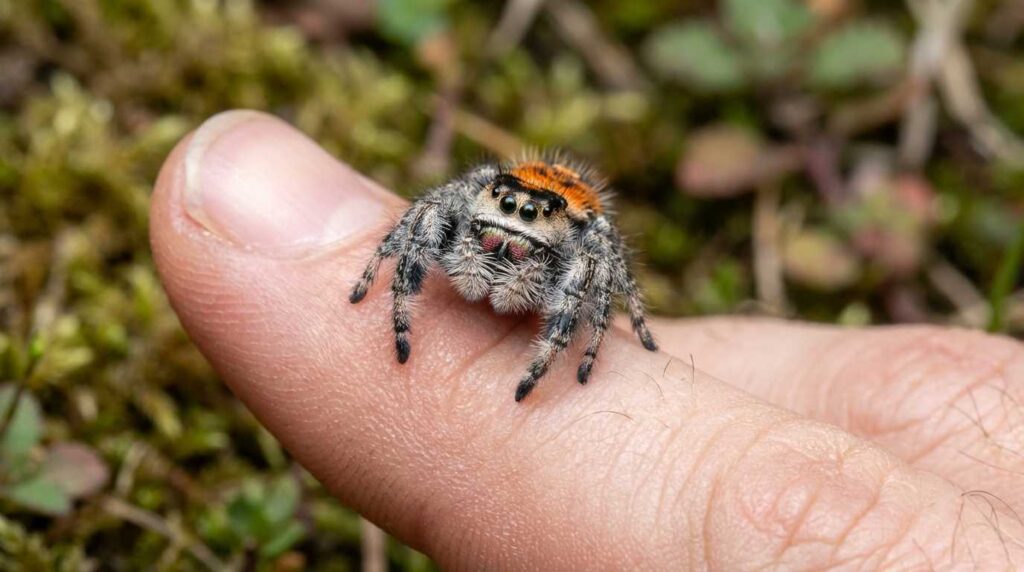
Are you ready to welcome a new eight-legged friend into your home? Whether you are a parent looking for a fun STEM activity for your middle schooler, or a hobbyist wanting to create a slice of nature, setting up a jumping spider habitat(Salticidae) is a rewarding project.
Jumping spiders (Salticidae) are not your average arachnids. They are intelligent, curious, and incredibly interactive. However, they have very specific needs. In this comprehensive guide, we will walk you through exactly how to set up a jumping spider habitat that is safe, enriching, and beautiful.
🧠 Step 1: Research Your Species (STEM Activity)
Before you buy a tank, you must understand the biology of your pet. Most popular pet species, such as the Phidippus regius (Regal Jumping Spider) and Phidippus audax (Bold Jumping Spider), are arboreal.
What does “Arboreal” mean? It means they live in trees, bushes, and high places. They rarely visit the ground. In the wild, they use their powerful legs to jump from branch to branch and build their sleeping nests (hammocks) at the highest possible point.
Why this matters for your setup: Because they are climbers, a wide, flat “fish tank” style enclosure will stress them out. They need vertical space to feel secure.
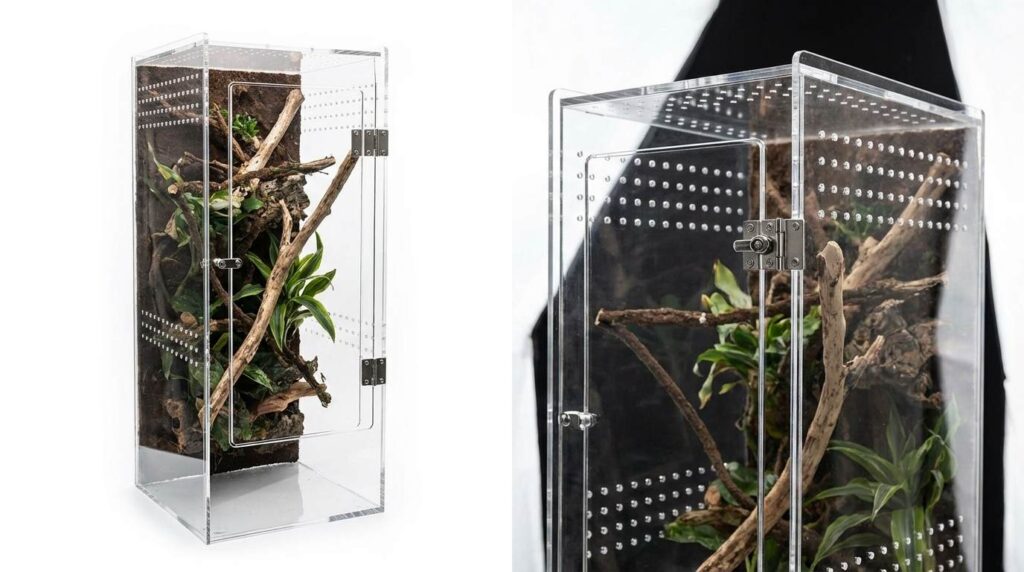
🏠 Step 2: Choosing the Right Enclosure
The most critical decision you will make is choosing the right spider enclosure size and type. Since jumping spiders are vertical climbers, your enclosure should be tall rather than wide.
Use the comparison table below to make sure you buy the right home:
Why Front-Opening is Mandatory
Never use a top-opening enclosure. Jumping spiders instinctively build their thick silk hammocks at the very top of the enclosure. If your lid opens from the top, you will tear their web every time you feed them or mist the tank. This causes extreme stress. Always choose an acrylic enclosure with a front-opening door or a side latch.
🌿 Step 3: Interior Design (Substrate & Decor)
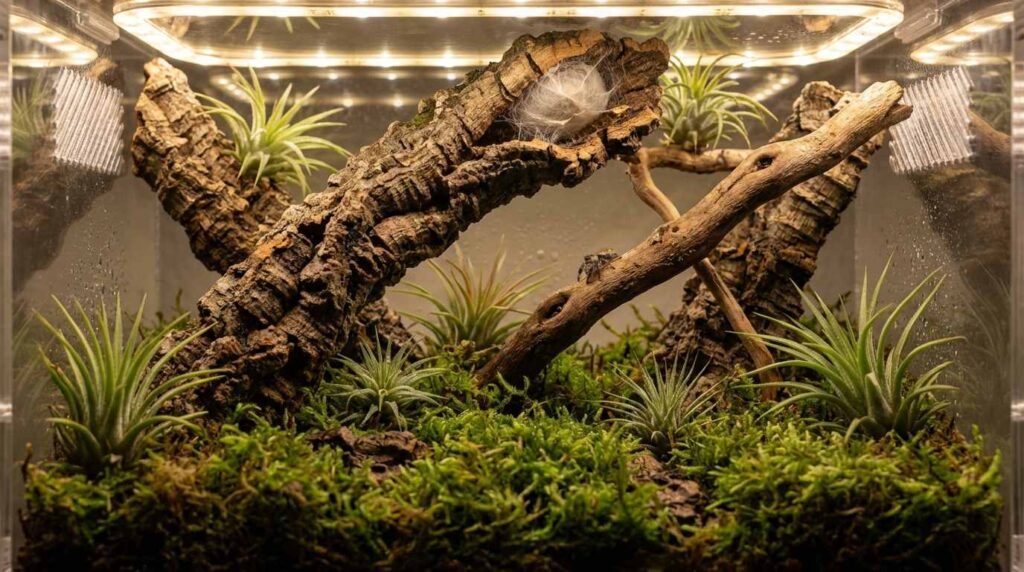
Now comes the fun part: turning a plastic box into a naturalistic jumping spider habitat.
Substrate Options
The floor of the enclosure helps maintain humidity. Add 1–2 inches of coco fiber, organic potting soil, or sphagnum moss.
- Inert Setup: Uses fake plants and treated moss. Easy to clean and prevents mold.
- Bioactive Setup: Uses live plants and a “cleanup crew” of springtails to eat waste. This creates a self-sustaining ecosystem.
Climbing Structures & Hides
Your spider needs a “jungle gym.”
- Cork Bark & Twigs: Use natural wood to create climbing paths from the bottom to the top.
- The “Canopy” Hide: You must provide a hiding spot at the top of the tank. A magnetic walnut hide or a simple silk cocoon is perfect for resting and molting.
- For Senior Spiders: As spiders age, they lose their grip. Install webbed moss ribbons or mesh ladders to help them reach their food without falling.
⚠️ Safety Tip: If you collect branches from outside, bake them at 200°F (93°C) for 30 minutes to sterilize them and kill any harmful parasites.
🌬️ Step 4: The Science of Cross-Ventilation
Proper airflow is the secret to a healthy spider. Stagnant air kills spiders faster than hunger. You need to achieve Cross-Ventilation.
How to do it: Ensure your enclosure has ventilation holes on opposite sides (e.g., left and right, or top and bottom). This allows fresh air to enter one side and push stale air out the other. This airflow prevents mold growth and bacteria blooms, which can be fatal in a humid environment.
🌡️ Step 5: Mastering Parameters (Temp & Light)
To keep your spider active and hunting, you need to dial in these three parameters.
Lighting
Jumping spiders are visual hunters. They need bright light to see their prey. Use a bright LED light (6000K daylight white) and keep it on for 12 hours a day.
⚠️ Warning: Never place the enclosure in direct sunlight. The greenhouse effect will cook your spider in minutes.
Temperature & Humidity
Most species thrive at room temperature. If your home is very cold, use a small heat mat on the side (not bottom) of the tank. For humidity, aim for 50%–60%. Use a fine mist spray bottle to mist the side of the enclosure once a day.
💧 Step 6: Maintenance & Feeding Routine
Once your DIY jumping spider habitat is set up, daily care is simple.
- Feeding: Feed young spiders flightless fruit flies. Adults enjoy green bottle flies or mealworms.
- Cleaning: Remove any uneaten food after 24 hours to prevent mold.
- Observation: Start a “Spider Journal” with your kids! Record when they eat, when they molt, and watch how they track your movement. It is a fantastic way to build observation skills.
❓ FAQ: Common Questions
Do I need a water bowl for my jumping spider?
No. They prefer to drink misted water droplets. Water bowls can be dangerous drowning hazards.
Can I put two spiders in one habitat?
Absolutely not. Jumping spiders are cannibalistic. If you house them together, the bigger one will eat the smaller one. Always keep them separate.
Why is my spider hiding in its web for days?
It is likely in pre-molt. This means it is growing new skin. Do not disturb or feed them during this time; just keep the humidity up.
Habitat Setup Complete! ✅
Now that your jumping spider has a 5-star resort, the next step is keeping their belly full. Do they eat fruit? Do they need supplements? Find out in our complete feeding guide below!
📖 Read Next: What Do Jumping Spiders Eat?